New in Q4: Import CSV, Polls, and convert channel visibility

Pumble continues to evolve with new features designed to simplify teamwork and enhance collaboration. In Q4 2024, three exciting updates have been introduced: importing from CSV files, polls integration, and converting private to public channels.
Import data from CSV
The Import from CSV feature is a powerful tool that allows teams to seamlessly transfer data into Pumble. Whether you're bringing over users, channels, or even message history, this feature makes onboarding and data migration hassle-free. If you are switching to Pumble from other tools, you can move your workspace content from any platform, like Slack and Microsoft Teams, by importing a CSV file with it to Pumble.
Teams migrating from another platform or starting a new workspace can rely on the CSV import to save time and ensure accuracy. Instead of manually adding each user and channel, you can upload everything in bulk. This not only speeds up the process, but also reduces the chances of human error.
It's especially valuable for larger organizations with complex team structures or those who need to preserve historical data. By integrating this feature into your setup process, you'll experience a smoother transition to Pumble's intuitive workspace.

The benefits of importing data from CSV file
Efficient members onboarding
Quickly add all employees or partners
to the platform, ensuring they're instantly connected to team channels and
conversations.
Reduce errors
Importing data directly from a CSV file ensures
accuracy and consistency across your team, reducing the chance of mistakes from manual
entry.
Manage time
Importing large numbers of members into Pumble without
having to manually enter each one saves time and reduces human error.
Key use cases
Onboarding new employees
Example: HR departments can import lists
of new hires directly into the communication platform, making sure they're added to the
right teams and channels.
Team management for large companies
Example: For larger teams,
importing CSV files allows administrators to quickly and easily manage membership and
permissions without the hassle of adding members individually.
Partner and client communication
Example: Companies can import
partner or client chats into Pumble, ensuring consistent communication and access to
relevant discussions or channels.
How it works
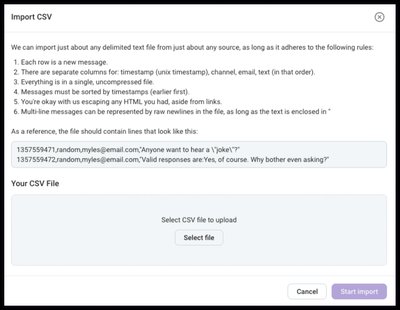
To import a CSV file in Pumble, start by navigating to the Workspace settings and selecting General settings from the dropdown. Then, open the Import & Export section and go to the Import tab. Click on the "Import" button in the CSV section and select the file to upload. After selecting your CSV file, click "Start import" to begin the process. Once the file is uploaded, click the "Information required" button to continue, or click "Cancel" to stop the import.
If there is an existing user with the same email address as one in the CSV file, the user will automatically be mapped to that existing account.
Learn more about Importing data from CSV file: Import data from CSV
Polls Integration
The Polls Integration feature in Pumble enables teams to quickly collect feedback and make data-driven decisions. Polls allow team members to vote on various issues, topics, or decisions, helping teams stay engaged and make collective decisions effortlessly.

The benefits of Polls integration
Faster decision-making
Polls enable quick, efficient
decision-making processes, allowing teams to respond to changes or gather opinions in
real-time.
Improved collaboration
Engage everyone on your team by gathering
insights and opinions through easy-to-create polls, helping ensure everyone's voice is
heard.
Instant feedback
With instant feedback from polls, managers can
gather data that helps in making informed decisions.
Key use cases
Team feedback sessions
Example: Teams can use polls to gather
feedback on ideas, products, or strategies, ensuring that all members contribute their
input before making a decision.
Event planning
Example: Polls help in organizing team events by
asking team members to vote on dates, activities, or locations.
Resource allocation
Example: Polls can be used to prioritize tasks
or projects, allowing teams to determine which items require more focus or resources.
How it works
To connect Pumble with Polls, begin by clicking the +Add apps button at the bottom of the left sidebar. Next, click the Install button next to the Polls app, which will open a new tab with the consent form and integration details.
If the app is already installed in your workspace, you will need to authorize it to create polls. Simply click the Authorize button next to the app name, select the Workspace from the dropdown, and ensure you are logged in to the chosen Pumble workspace. Once authorized, click Allow to complete the installation.
Creating polls
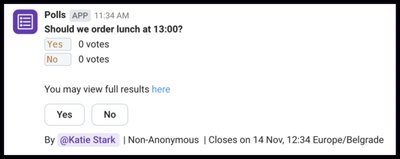
Once the Polls integration is set up, you can start creating polls within your Pumble channels using various commands. To create a simple yes/no poll, type /polls yes or no question in any public or private channel, group DM, or direct message, and press Enter.
For a poll with custom answers, use the /polls ask question -answer1 -answer2 .... -answerN and command, where you can define multiple answers and choose options like anonymity and poll closing times.
Additionally, you can create a poll with predefined answers by typing /polls create question and selecting from the dropdown options. After creating your poll, you can submit it to the selected channel and manage its visibility and response settings.
To view the results of your polls, simply click the link at the bottom of the poll message. A page will open displaying the poll's answers and votes, accessible for up to 7 days after the poll closes. This integration allows teams to gather quick feedback and make informed decisions directly within Pumble, streamlining collaboration and decision-making.
Learn more about Polls integration in Pumble: Polls integration
Convert private channels to public
The ability to convert private to public channels allows Pumble users to easily adjust the privacy settings of their channels. This feature is perfect for teams that want to share information, resources, or discussions with a wider audience within the organization.

The benefits of converting private to public channels
Improved transparency
Making channels public helps ensure that
information is accessible to everyone in the team, fostering transparency across the
organization.
Boosted collaboration
By converting a private channel to public,
more team members can join discussions and contribute, increasing overall collaboration.
Better knowledge sharing
Public channels promote the sharing of
valuable knowledge and updates with the entire team, leading to a more informed and
connected workforce.
Key use cases
Project Updates
Example: Teams can convert private project
channels to public to allow broader access to updates and discussions about the
project's progress.
Company-wide announcements
Example: Managers can change private
channels to public for wider distribution of important announcements, ensuring all team
members stay in the loop.
Cross-team collaboration
Example: Different departments or teams
can convert their private channels to public for cross-team projects, helping share
insights and strategies that benefit the entire organization.
How it works
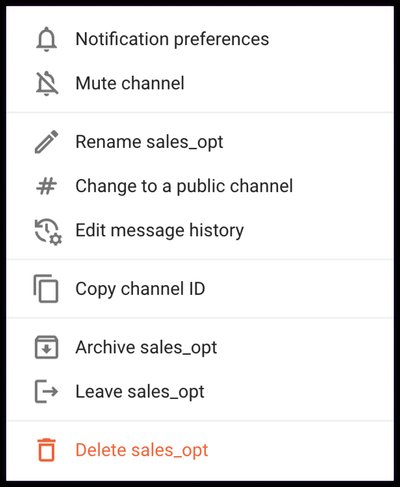
To convert a private channel back into a public one, open the channel you'd like to update and click on the Information icon at the top right corner. From there, select the "More" option and choose "Change to a public channel." Confirm the update by clicking "Change to public," and all channel members will be notified inside the channel that it has been converted to public. This simple process ensures that your team's communication remains transparent and accessible to everyone.
Learn how to convert a private channel to public: Convert a private channel to public