New in Q3: React and reply to comments, shift timelines, and more (so far)

We’ve rolled out a series of new features designed to boost user productivity. Not only did we introduce the ability to reply and react to comments, shift dates and timelines in bulk, streamlining project adjustments, but we also launched options to pin fields, keeping them sticky in table view for easier navigation, as well as to add field descriptions for more clarity.
Replies and Reactions to Comments
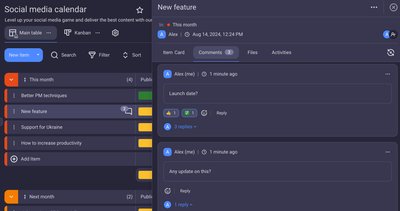
So excited to announce our latest feature: Replies and Reactions to Comments!
This new addition enhances communication and collaboration within Plaky, keeping everyone informed and engaged with tasks. Specifically designed for coordinated communication, this feature is a key part of the item card, found within the comments section under each comment.

Benefits of replies and reactions
- Seamless communication: Replying to comments allows for clear, threaded conversations, making it easy to keep track of discussions and updates.
- Enhanced engagement: Reactions provide a quick and expressive way to acknowledge, agree with, or express sentiment towards a comment, fostering a more interactive and responsive environment.
- Efficient collaboration: With replies and reactions, teams can communicate more effectively, reducing the need for lengthy email chains or separate chat tools.
How to use replies
- Reply to a comment:
- Click on "Reply" under a comment.
- Enter your reply.
- Click "Add Reply" to complete the action.
- Note: A reply to a comment can also be pinned for easy reference.
How to Use Reactions
- Leave a reaction:
- Click on the emoji icon under a comment.
- Select an emoji to complete the action.
- React to existing reactions:
- Click on an emoji that has already been left by another user.
- Hover over the reaction to see who left it.
- You can leave multiple emoji reactions on a single comment.
Key use cases for Replies and reactions
- Real-Time Feedback: Quickly respond to comments with feedback, questions, or additional information, ensuring timely updates and decisions.
- Acknowledge Contributions: Use reactions to show appreciation or agreement, encouraging active participation and recognition within the team.
- Enhanced Documentation: Keep a clear record of discussions and decisions directly within the task comments, making it easier to track progress and refer back to important points.
Additionally, if you opt-in to receive notifications, you will get in-app and push notifications each time someone replies or reacts to your comments, ensuring you never miss an update.
Start using the Replies and Reactions to Comments feature today to boost your team's communication and collaboration!
Shift dates and timelines in bulk
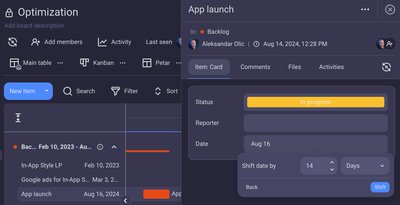
We’re excited to introduce a new feature that makes managing your projects easier: the ability to shift dates and timelines.
This tool is essential for adjusting your plans when project scope changes, resources are unavailable, or external factors come into play, helping you keep your project schedules realistic and achievable.
Why shifting Dates/Timelines is important
Projects are dynamic and often subject to unforeseen changes. Whether it's a shift in project scope, unexpected resource restrictions, or external factors beyond your control, the ability to adjust your project timelines in the most effective manner is essential.
Our new feature allows you to seamlessly shift dates and timelines, helping you maintain accurate and realistic project plans.

Benefits of using Shift dates-timelines
- Flexibility: You can easily adapt your project timelines to reflect any kind of changes or updates in scope.
- Accuracy: It’s easier to maintain up-to-date and realistic project plans, aligned with current timelines.
- Efficiency: Save time by applying bulk date shifts and eliminating manual adjustments. Quickly realign multiple timelines with a few clicks.
Common use cases
- Project Scope Changes: Projects often evolve, and their scope can expand or contract. With the shift dates/timelines feature, you can easily adjust your timeline to reflect these changes, ensuring that your schedule remains accurate and achievable.
- Resource Availability: If a key team member is suddenly unavailable or additional resources become available, you can quickly shift the project dates to accommodate these changes, keeping your project on track.
- External Factors: Sometimes, factors outside of your control, such as market changes or client requests, can impact your project timeline. This feature allows you to adjust your schedule in response to these external influences.
- Milestone Adjustments: Key milestones are crucial for tracking progress. If a milestone needs to be moved, you can shift the dates to ensure that all project elements stay aligned and on schedule.
- Deadline Extensions: If a deadline extension is granted, use the shift feature to update your project timeline accordingly, ensuring that all team members are aware of the new deadlines.
How to use the Shift Dates/Timelines feature
Using this feature is simple and intuitive. Follow these steps to shift dates and timelines effectively:
- Click on the Date/Timeline Field:
- Navigate to the item you need to adjust.
- Click on the date or timeline field associated with that item.
- Select "Shift Item’s Dates/Timelines":
- A menu will appear. Choose the option to shift the item’s dates/timelines.
- Specify the Number of Days:
- Enter the number of days you want to shift the dates.
- For timeline fields, make sure to input the number of days to adjust both the start and end dates.
- Click "Shift":
- Once you’ve entered the necessary adjustments, click the "Shift" button to apply the changes.
- Confirm the Action:
- A confirmation modal will appear.
- Click "Proceed" to finalize and complete the date or timeline shift.
Start using the shift dates/timelines feature today and keep your projects on track!
Pin fields
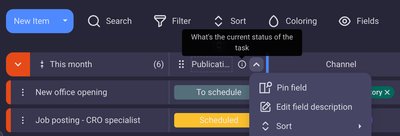
We're thrilled to introduce the Pin Fields feature which allows you to keep important fields fixed in place as you scroll. It ensures they remain visible and easily accessible. Each pinned field will follow the last pinned field, keeping key information always in sight. It is available only in table view.

Benefits of Pin Fields
- Enhanced Visibility: Keep critical fields in view as you navigate your table, making it easier to focus on important data without constantly scrolling.
- Improved Efficiency: Quickly access frequently used fields without losing your place in the table, streamlining your workflow and reducing time spent searching for key information.
- Customizable Layout: Tailor your table view to highlight the fields that matter most to you, improving your overall data management experience.
How to Pin/Unpin a Field
- Using the Field Name Menu:
- Click the downward arrow next to the field name.
- Select "Pin/Unpin field" from the dropdown menu to complete the action.
- Using the Fields Visibility Icon:
- Click the Fields Visibility icon.
- Select the fields you want to display.
- Click the pin/unpin icon next to the fields to pin or unpin them.
Common use cases
- Focus on Key Metrics: Pin fields that track essential metrics to keep them visible, ensuring you can monitor important data at a glance.
- Streamline Data Entry: Keep fields that require frequent updates fixed in view, making data entry more efficient and reducing the need to scroll.
- Enhance Reporting: Pin fields that are crucial for reporting purposes, allowing you to quickly generate and review reports without missing important details.
Start using the Pin Fields feature today to customize your table view and enhance your data management efficiency!
Field descriptions
Welcome to another Plaky feature - Field Descriptions feature! It’s small but significant. Because it allows you to set descriptions for any board field, making it easier for everyone to understand its purpose and how to add values accurately.

Benefits of Field Descriptions
- Clarity: Provide clear instructions and context for each field, reducing confusion and errors.
- Consistency: Ensure everyone adds values in a consistent manner, improving data quality.
- Efficiency: Save time by eliminating the need for repetitive explanations and reducing the learning curve for new team members.
How to Use Field Descriptions
- Access the Field:
- Navigate to the board field you want to describe.
- Add a Description:
- Click on the arrow for configuring the field.
- Select the option to add a field description.
- Enter a clear and concise description explaining the field’s purpose and how to add values.
- Save the Description:
- Save your changes to ensure the description is visible to all users.
Key Use Cases for Field Descriptions
- Onboarding: Help new team members quickly understand the purpose of each field and how to use them correctly.
- Data Entry: Provide guidelines for consistent data entry, ensuring everyone follows the same standards.
- Project Documentation: Offer context for complex fields, making it easier for team members to understand and use them effectively.
Go ahead and start using Field descriptions today to enhance clarity, consistency, and efficiency across your board!