Import board data

Is your current project management app falling short of your team's needs?
Is it too rigid, limited, or expensive?
No worries. You're in the right place! Plaky is the perfect alternative for small to medium-sized teams seeking a flexible tool that adapts to their specific preferences and grows with them, all without straining their learning curve, budget, or user experience.
Once you decide to transition to Plaky, rest assured that your data will be securely transferred to the newly created board without any hassle.
Thanks to our newly introduced Data Import feature, you can transfer one or more boards from your existing account, allowing you to continue managing your projects and tasks seamlessly without any interruptions or delays.
How to transfer data into Plaky
To ensure efficient organization and import of data the process is divided into 4 clear steps.
- Preparing your data for export
- Importing your data into a new or existing Board
- Generating the table
- And lastly, mapping out your Board Data
The duration of the import process can vary, depending on the amount of data stored in your current account.
Please be aware that you can only migrate one board at a time.
Step 1: Prepare your data for export
Before you start transferring data, you’ll need to get the data prepped and ready into a CSV document.
You can get this data from any project management software such as Monday.com, Trello, Asana, Click-up, and more!
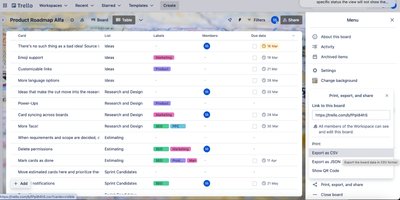
For example, if you want to export data from your Trello account, go to the main menu and go down to the print, export or share option and select Export to CSV.
You’re all set now and ready to move onto the next step and import your data!
Step 2: Import data into a new or existing board
Now that you have your CSV file ready, you’ll choose if you want to import the file to a new board or an existing board.
For starting a new board you’ll need to:
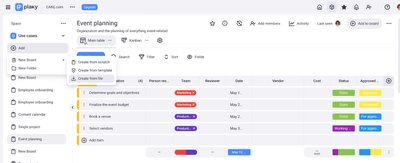
- Go to the Space Menu located on the top left corner and click on the +Add Button.
- From the dropdown menu select “new board”
- Choose Create from file and select Import from CSV
- Select the file you want to import, click open and you’re all set!
For adding data to an already existing board, you’ll want to do the following:
- Go to the Board menu in the top right corner and choose “Import from CSV”
- Select your file, and the data will be added!
Now that your data is added, you’re ready to move on to the next step!
Step 3: Generate the table
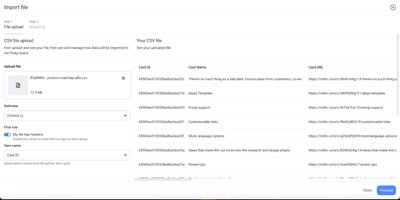
After uploading your file, a window will pop up on the right of your screen displaying the data inside your CSV file. Now is a good time to check and make sure all of the correct data is there.
Plaky usually uses a comma as the default delimiter, but don't worry—you can switch it to a tab, pipe, space delimiter, or semicolon, depending on how your CSV file is set up.
Here’s the steps that you need to take:
- Pick your delimiter from the dropdown menu.
- Toggle the First Row button on if your file has headers.
- Lastly, choose which column names the items. And you’re done!
If the file is not marked to have headers, the first row is treated as item data and for CSV column names generic names will be used: Column 1, Column 2, etc.
If you don’t select which column defines the item name, the first column from your CSV file will be used by default as the item name.
Step 4: Map your board data
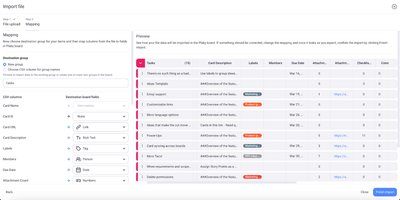
It's time to decide where your items will land and connect the columns from your file to fields in your Plaky board.
Select the desired destination group:
- Choose an existing group from the dropdown menu, or
- Create a new group by typing in the name.
Define item names
Specify which field from the CSV file names your items.
Define fields
For every CSV column, choose the corresponding board field type from the dropdown menu. You can either select an existing field, create a new one, or choose not to map the column at all.
Important things to remember:
- If the column names match existing fields, they'll be automatically mapped.
- Any unmapped columns won't carry over, so make sure you've got everything sorted.
- You can't change the mapping for columns used for task names and group names.
Once you are sure you’ve defined the basic info about your CSV, you can move to the final step.
Finalize the import
After you’ve finished up generating your table and mapping your data, you can move on to finalizing the import.
Review the mapped columns and make sure all necessary configurations are in place. If everything looks good click "Finish Import" to complete the data import.
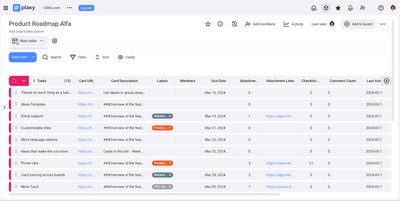
Tip:
If you're done with your import and are ready to move stuff around, take advantage of our Bulk edit feature and save some time.
FAQ
What file formats are supported for import?
Data for import must be prepared in CSV format, as P supports only this document type.
Can I import data into an existing board?
Yes, you can enhance Plaky Board’s functionapty and data management by importing CSV data into an existing Board, seamlessly integrating information from external systems.
What is the maximum file size allowed for import?
The import size limit is capped at 10MB.
Support
If you run into any issues or have any questions, you can always contact our support team which is available 24/7!