New in Q3 2025: Recurring invoices, Balance validity and other improvements

Latest updates reflect on managing time off policies, together with multiple improvements in invoicing management process.
- (Optional) Balance validity dates
- Recurring invoices
- Send invoice to multiple addresses
- Reminders if the invoice is past due
- Bulk submit/approve/reject timesheets
Balance validity dates
Managing time off policies now has the option to set up in which time period can time off balances be used by your team members.
By default, all time off policies are set without an expiration date. But, you can choose to set start and end date to define a balance validity period.
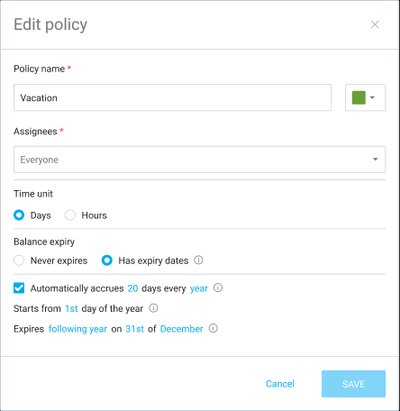
You can set validity dates when you’re creating new policies, or you can set it up when you edit existing policies.
Managing user’s balance
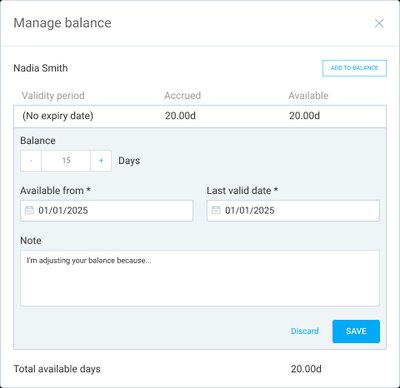
You can set a specific validity period (start and end date) to any user’s balance, so that user will only be able to make time off requests during a specific time period.
Once that time period ends, the balance will expire and be automatically removed.
To do that, go to the Balance tab, filter out the specific policy, and select a user whose balance you want to update.
Recurring invoices
Clockify now allows you to mark invoices as recurring while you create them, so you can make the whole process more efficient, making sure no billing cycle is missed.
This way you can avoid manually creating the same invoices for the same clients for different time periods.
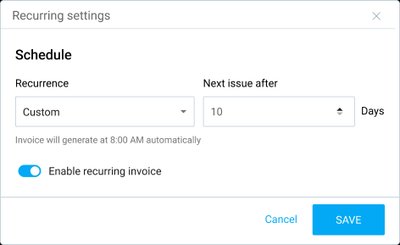
Recurring periods can be customized or set as weekly, bi-weekly, or monthly.
When you create an invoice, enable the recurring option, and customize the recurring period.
Invoices with active recurring settings will have a circling arrows icon next to them.
The next invoice will then import items based on the initially set invoice - just for the customized time interval.
Send invoice to multiple addresses
Besides sending your invoices to the main client’s contact email address (e.g., owner, CEO), now you can add additional email addresses to ensure your invoices reach the right people - finance, accounting, or administrative teams.
You can define these additional email addresses right from where you’re creating a client.
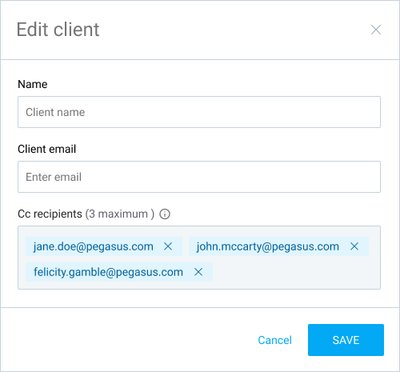
Or, you can add email addresses when you’re sending out the invoice or invoice reminders.
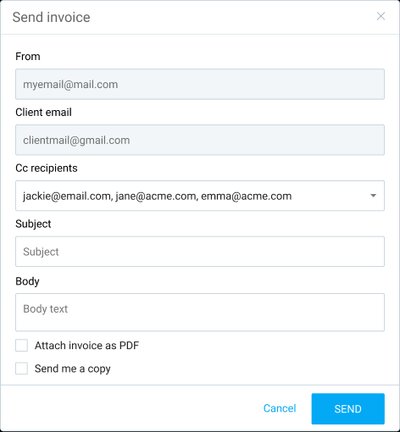
If you’ve set additional email addresses on the Clients page, you will be able to
edit or remove those emails when you’re sending out the invoice.
In case you
edit or delete emails here, that change will also reflect on the Client profile.
The maximum number of additional emails is three.
Reminders if the invoice is past due
Clockify now allows you to get notified about overdue invoices and prevent missed or delayed payments.
This way, you can reduce manual follow-ups and manual checking of overdue payments, improving financial transparency within your team and with clients.

Notifications are received via email and within the app, as well. With overdue invoice reminders:
- You will receive email notifications listing all overdue invoices for the day.
- You will receive separate in-app notifications for each overdue invoice.
- A new setting will allow you to enable or disable past-due invoice reminders.
- You can configure who receives notifications (admins, invoice managers, or specific individuals).
This feature will help you stay on top of your outstanding invoices and facilitate timely payments.
Bulk submit / approve / reject timesheets
Clockify now allows you to do a bulk submission of unsubmitted timesheets for multiple people at once.
To bulk submit timesheets for others:
- Go to the Approval page and choose the Unsubmitted tab
- Check the boxes next to the timesheets you’d like to submit
- Check the box at the top of the column to select all timesheets in that submission period and confirm the action
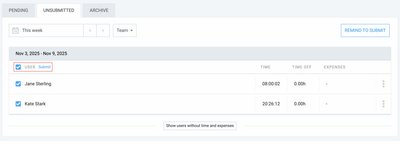
Bulk approve or bulk reject works in a similar way. If you go to the Approvals page and choose the Pending tab, you will see all submitted timesheets.
To perform bulk action:
- Check the boxes next to the timesheets you want to approve/reject
- Click Approve/Reject button that appears
- Confirm the action for approval, or add a note for rejection and reject timesheets

When selecting timesheets to process, you can choose multiple across different submission periods.
You can also now see rejected approval requests in the Approvals page in the Archive tab.
When you display rejected timesheets, you will see the detailed view that includes:
- User name and submission period
- Date & time of submission
- Timesheet details (time entries, expenses)
- Rejection comment explaining why timesheet wasn’t approved