New in Q3: Multiple timesheet templates, task expenses, and more (so far)

Clockify’s latest features enhance time-tracking efficiency, improve financial accuracy, and simplify team management, making it easier to manage projects and resources effectively.
- Multiple timesheet templates
- Task expenses
- Attendance report
- Group search
- Global "Week start" setting
Multiple timesheet templates
Timesheets in Clockify allow you to fill in your weekly work activities in total, however you categorize your time.
With timesheet templates, you can save a typical workweek and apply it to your next timesheet.
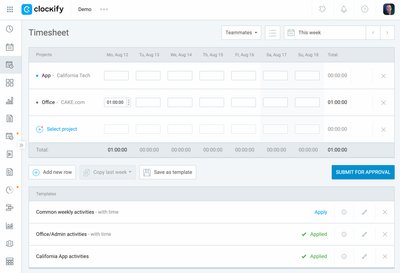
Now, Clockify allows you to apply multiple timesheet templates to your current week and quickly populate timesheets before submitting them for approval.

The benefits of using multiple timesheet templates
- Faster Time Logging: Instead of manually entering time for each task or project every week, you can quickly populate your timesheet using pre-defined templates. This reduces the time spent on administrative tasks, allowing you to focus more on productive or creative work.
- Consistency: With templates, important tasks and projects are logged consistently each week, reducing errors and discrepancies in time tracking.
- Adaptability: Some weeks might require different time allocations on the same projects. With multiple templates, you can easily adjust your timesheet to match your current workload or shift priorities without extensive rework.
- Minimized Errors: Repeated manual entry increases the likelihood of mistakes. Templates reduce this risk by ensuring that the basic structure of your timesheet is correct every time.
- Alignment with Reporting Needs: If your organization requires specific time tracking for reporting or billing purposes, timesheet templates help you meet these requirements consistently.
- Streamlined Approval: Having well-structured timesheets populated from templates means less back-and-forth with managers or clients during the approval process. Timesheets are more likely to be complete and accurate, reducing the need for revisions.
How to apply multiple templates?
Creating a template is easy. Once you fill in projects and tasks you have been working on, mark the option to save the timesheet as a template.
You will have the option to also save the recorded time associated with your projects, or save only recorded projects.
To apply timesheet templates, choose them from the list and click ‘Apply’. Once applied, the status of the entry changes to Applied.
If entries in the template overlap with existing entries in the timesheet, users can specify how to handle these conflicts:
- Replace the existing time entries with those from the template
- Skip and the template will ignore cells where time entries already exist
- Add will incorporate time entries from the template with the existing ones
After successfully applying a template, a shading animation will highlight the outline of all updated cells. This can help you easily identify the cells that have been added or updated on the currently active timesheet.
Task expenses
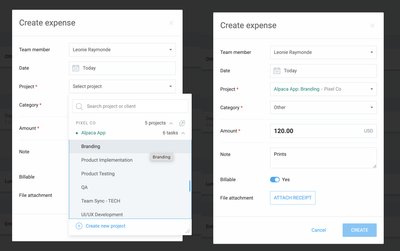
Recording expenses is tied to their category and project. Clockify now allows you to be even more specific about tracking expenses by tying them to specific tasks.

How to record task expenses?
To record a specific expense on a task, you have to make sure the project with that task is set up, and that the expense category is created.
Then you will be able to choose a specific task as you record the expense the usual way - choosing the date and the amount, adding a bill picture, marking it as billable or non-billable.
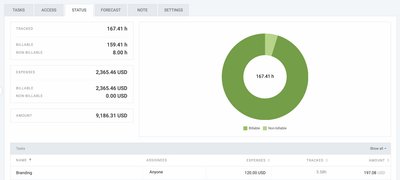
If the expense is marked as billable, it will be reflected in the project budget as well. Clockify will list all project tasks with an overview of expenses related to each.
The benefits of recording task-related expenses
Expense tracking has always been a great part of efficient project management. The more details we can log, the better position we will be in to fully analyze costs and draw conclusions about profitability.
Here is why logging task-related expenses is useful:
- Accurate cost tracking: Associating expenses with specific tasks helps in tracking the exact costs associated with each part of a project. This allows for more precise budget monitoring, ensuring that you stay within financial constraints.
- Task-level budgeting: By linking expenses to tasks, you can compare the budget allocated for each task with the actual expenses, allowing for better control and adjustment of resources.
- Detailed financial insights: When expenses are tied to specific tasks, it’s easier to analyze which parts of a project are more costly and whether they contribute proportionally to the overall value of the project. This can help identify areas where cost savings could be made.
- Detailed reports: You can generate reports with breakdowns of expenses by tasks to see where the majority of expenses are going. This level of detail is invaluable for financial analysis and decision-making.
- Strategic planning: Understanding task-level expenses helps in planning future projects by identifying which tasks tend to go over budget and may require either additional resources or more efficient management.
- Improved transparency & Trust: Being able to show clients or stakeholders how expenses relate to specific tasks within a project enhances transparency and fosters better communication about project progress and cost management.

Attendance report updates
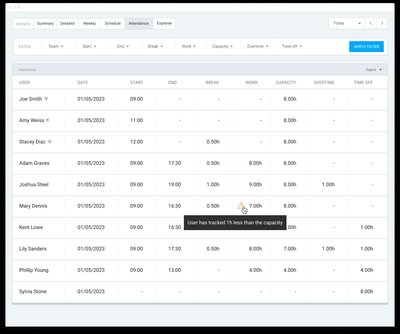
The attendance report has visual changes but still shows the same information.
The Overtime column now shows only the number of hours worked above the capacity.
For the members who have worked less than their working capacity, the Attendance Report will show an exclamation icon.
The Work column includes a warning symbol for users who worked less than their capacity, with a hover message showing how many hours are left to work.

Searching by groups
Project management is easier with groups. Rather than adding people one by one to a project, you can create a group and assign it to a project at once.
Within the Team page, you can manage users and search them by name or email. But now, you can do the same for Groups.
Using the new search bar in the Groups tab, you can enter the group name or team member, and jump right to editing or adding new members.
Global "Week start" setting
Owners or Admins can now set the week start day on a workspace level for all workspace members, instead of each person setting it out individually.
With this update, we also make sure that each person receives their weekly tracked time report on the same day.