New in Q2: Pumble integration, improved Windows app, and Team filters

Get Clockify time tracking reminders and notifications about time off requests and approvals directly in Pumble's chat. Also, we improved Auto tracker in Windows app, plus you can now filter your list of members by a wide variety of attributes.
Pumble integration: real-time updates, right in your chat
At CAKE.com, we help teams work smarter. Now, our Clockify time tracker and Pumble messaging platform are even better together, sending your important Clockify updates directly to Pumble. Keep your team in sync without switching apps!
How Clockify & Pumble work together
Say goodbye to constantly switching tabs or digging through multiple inboxes! When you connect Clockify to Pumble, you'll instantly get alerts about your time tracking and time off directly in your Pumble workspace. This means you can react faster, and stay way more organized.
What notifications can you get?
Clockify helps keep your projects on track and your team accountable, and with this Pumble integration, you'll get real-time nudges for key updates like:
- Timesheet status: Instantly know when timesheets are submitted, approved, or rejected. No more wondering!
- Time off updates: Get alerts for time off requests, approvals, and even balance updates.
- Time tracking reminders: Get notified for missed time tracking targets or unsubmitted timesheets and expenses.
And as Managers and Admins, you'll also receive:
- Time tracking summaries for your teams
- Approval requests for submitted timesheets
- Time off requests and their approvals
These notifications are truly designed to help your whole team stay organized, hit those deadlines, and react super quickly to anything new.
Setting up your notifications
Getting Clockify connected to Pumble is really straightforward:
- Automatic connection: If your Clockify and Pumble workspaces are both active and part of the same CAKE.com organization, chances are they'll connect on their own!
- Head to clockify preferences: Just pop open your Profile settings in Clockify and hop over to the Preferences section.
- Find "Pumble notifications": You'll see a tab specifically for "Pumble notifications" – click that.
- Connect your workspace:
- If you're new to Pumble, you'll find a clear prompt to create a workspace.
- Already have a an account with the same email? You can easily link to an existing workspace or even set up a new one.
- If you've got a few Pumble workspaces, simply choose the one you want to connect with Clockify from the list.
Once you're connected, we'll send you a little confirmation in both apps, and then you're all set to manage your notification preferences.
Manage your notifications your way
You're completely in control of what notifications land in your Pumble:
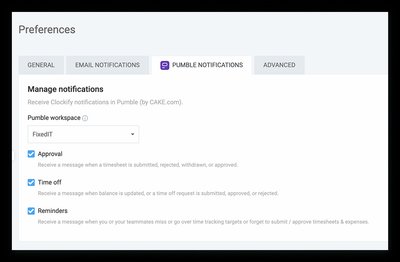
- Go to Preferences
- Choose Pumble notifications tab
- Just choose your connected Pumble workspace.
- Then, simply check or uncheck the specific Clockify notifications you want to receive. This includes:
- Time tracking reminders (daily, weekly, monthly)
- Time off updates (requests, balances)
- Timesheet approvals (submitted, withdrawn, on behalf)

Stop notifications
Want a break from notifications? Just uncheck them all or select "none" as the notification type. You can always reconnect or choose a different Pumble workspace anytime you like!
A few important notes on integration
As you get Clockify and Pumble working together, just keep these few things in mind:
- User sync: Heads up: any active users from Clockify will need to be manually added to your Pumble workspace.
- Profile updates: Good news! If you change your email or profile details in Clockify, those updates will automatically show up in Pumble.
- Pumble changes don't affect Clockify: Just remember that if you add or remove users in Pumble, it won't change anything in Clockify. You'll need to update both separately.
By bringing Clockify and Pumble together, you're truly streamlining your team's workflow within the CAKE.com ecosystem, helping everyone stay aware in real-time and boosting overall collaboration.
Improved Windows app
We're thrilled to announce a significant update to our Windows app, packed with new features and improvements designed to enhance your experience and boost productivity.
Smarter auto tracking
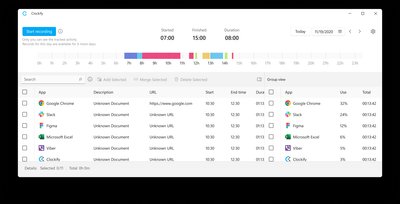
- Auto logging now lets you set the Auto Tracker to start and stop automatically with the app, and define specific time ranges for activity tracking.
- The auto tracker timeline has been improved to display your entire day, offering much better visibility into your tracked activities.
- Find specific activities with Auto tracker search, which includes helpful suggestions to speed up your search process.

Enhanced user experience
We've refined many everyday interactions:
- Improved pickers: All pickers (for projects, tasks, tags, and custom fields) have received a significant upgrade in both appearance and functionality, making selection quicker and more seamless.
- Default project option enhanced: You now have more flexibility to choose your default project—either the last one you used or a specific project you designate.
- Color picker added: Personalize your projects by selecting a custom color directly within the app.
- Task estimate option added: You can now set an estimate for any task right from the Windows app, streamlining your planning.
Easier account management & performance
- A new account tab has been added to Preferences, providing quick and easy navigation to your account settings.
- As always, we've included Bug fixes and performance improvements to ensure the app runs smoother and more reliably than ever before.
Team filters
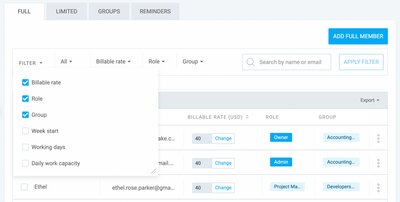
Team page now allows you to customize the view by adjusting which data you want to see or even export. With active filters, you can quickly find specific team members, edit their profiles, or assign roles easily.

You can control which columns are shown in the Team table by checking or unchecking available filters in the filter dropdown. In this way, you can include or exclude information on team member’s:
- Billable rate
- Cost rate
- Role
- Group
- Week start
- Working days
- Daily work capacity
- Assigned team manager
Once the filters are applied and the Team table’s columns are adjusted, you can even further sort out the data by choosing specific values for each active filter.
For example, if you decide to increase the cost rate for certain teams, you can select specific groups and set the cost rate column to show only cost rates smaller than $20.
Now your data will be more focused, allowing for quick value changes.
Simple or compound tax mode per invoice
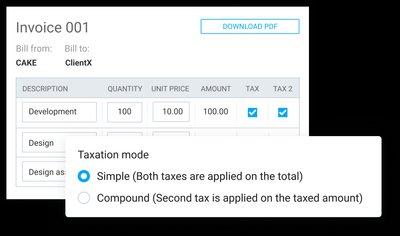
Besides setting your default invoice taxation mode as simple or compound, Clockify now allows you to choose the taxation mode you are using on each invoice.
To customize taxation mode:
- Open the invoice you’re working on
- Scroll down to the Taxation mode section
- Choose whether Simple or Compound taxation mode should be applied
Now tax settings will be customized for each client, ensuring your invoices comply with the necessary tax rules.
