Introducing: Board automations
Ever feel like you're spending too much time on repetitive tasks? Constantly updating statuses, moving items, or trying to remember who needs to be informed? What if your board could do all that for you?
Welcome to Plaky Board Automations. More than just a feature, they are your personal assistant, designed to eliminate repetitive manual tasks and let you focus on strategic, high-value work.
What exactly are board automations?
Board Automations are intelligent rules you set up within Plaky to trigger specific actions automatically. Think of them as a simple "When this happens, then do that" system. They can handle a wide range of tasks, like updating item fields, moving items, and managing who's subscribed—all without you lifting a finger.
Board Automations work with your items, subitems, or even a combination of both, giving you granular control over your workflow.
Why automate? Because your time is valuable!
Plaky's Board Automations go beyond simply saving clicks; they transform how you work. Once set up on your boards, you can:
- Reclaim your time: Eliminate repetitive tasks. Automations handle the routine, freeing you for strategic work.
- Boost your output: When tasks move seamlessly and automatically, your entire workflow accelerates.
- Reduce errors: Automations ensure consistent execution, minimizing human error.
- Maintain consistency: Ensure every process follows the same steps, every single time.
- Streamline communication: Keep everyone informed automatically by managing subscriptions.
- Sharpen your focus: Delegate routine tasks to automations, allowing you to concentrate on high-priority objectives.
Let’s get started
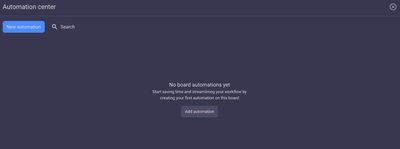
To get started, simply navigate to any board you're working on. In the top right corner, you'll find the Automations button, which leads you to the Automation Center. This is your hub for creating new automations and managing existing ones.
The basic formula for any automation is straightforward:
When something happens (Trigger) → If a condition is true (this step is optional) → Then do something automatically (Action).
Let's explore how to build these powerful automations with examples.
Your first custom automation, step-by-step
Creating a custom automation in Plaky is intuitive and designed for users of all technical levels.
1. Start your new automation
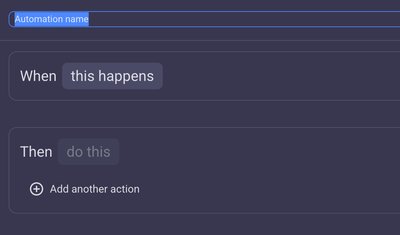
From the Automation center, click either New automation or Add automation. This opens the custom builder. It's a best practice to name your automation clearly at the outset, reflecting its purpose, e.g., "Auto-assign QA for Ready Designs."
2. Choose your trigger: "When this happens"
The trigger is the initiating event that tells Plaky to spring into action. Plaky offers several different trigger types:
- Item field changes: This is the most common and powerful. It activates when a specific field's value on an item changes.
Simple Example: When a task's "Status" field changes from "To Do" to "In Progress."
- Item moved: Triggers when an item changes its group.
Simple Example: When a task is moved from the "Backlog" group to the "This Week" group.
- Item subscribers change: Fires when someone is added to or removed from a task's subscribers.
Simple Example: When a new team member is added as a subscriber to a project brief.
To set your trigger, click on When this happens, select your desired trigger type, and fill in the necessary details.
3. Add optional conditions for more control
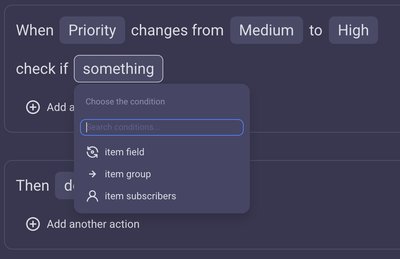
While triggers define when an automation starts, conditions add an extra layer of intelligence, specifying if the action should proceed. This step is optional but incredibly useful for creating precise workflows.
To add a condition, click + Add condition, choose the type, and complete the highlighted fields. You can even add multiple conditions to create highly specific rules.
- Example with one condition: You want an action to occur when a task's "Status" changes from "In Progress" to "Stuck," AND / OR if the task is in the "Urgent Issues" group. This ensures the action only applies to critical stuck items.
4. Define Your Action: The "Then Do This"
This is the exciting part – deciding what your automation will actually do! Plaky provides a wide array of actions:
- Moving the item to a different group.
- Assigning someone to the task.
- Changing a status field.
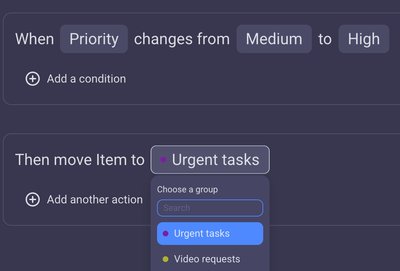
Click on Then do this and choose your desired action.
- Simple Action Example: If a task's "Priority" changes from "Medium," to "High," then move the item to the "Urgent Tasks" group.
Finalizing your automations
Once you've customized all the fields for your actions, hit Create automation – and you're all set!
Whenever your trigger and conditions are met, your automation will run automatically.
You and all parties concerned, will receive a notification. You can as well see a record of the automation's activity in the activity log on both the board and individual item levels.
Editing or deleting automations
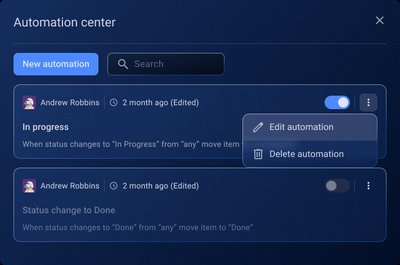
If you ever need to tweak an automation, it’s simple. Go to the Automation list tab in the Automation Center. Click the three dots next to the automation you want to change. You'll see options to Edit, Delete, or simply toggle it off.
Monitor automation usage
Curious how many automations your team has used? Go to the three dots next to your workspace name, then select Automations. Here, you’ll see how many automations your team has used and how many are left in your current plan. Remember: every time an action is triggered, it counts as one automation.
Advanced automations: Multiple conditions & actions
The real power of Plaky automations shines when you combine multiple conditions and actions to build sophisticated workflows.
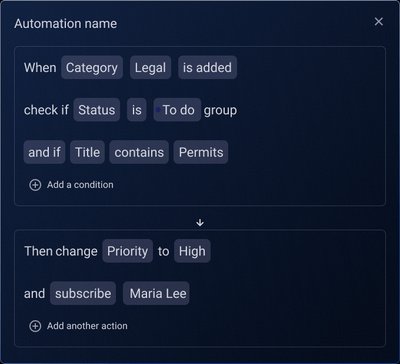
Scenario 1: Critical permit alert system
Imagine automatically flagging urgent legal tasks and ensuring the right person is instantly notified and subscribed.
- When: To "Tag field" "Category" Department "Legal." is added
- If: "Status" is "To Do."
- And If: "Title" contains "Permits."
- Then: "Change item field" "Priority" to "High."
- And Then: "Change item subscribers" to include "Maria Lee."
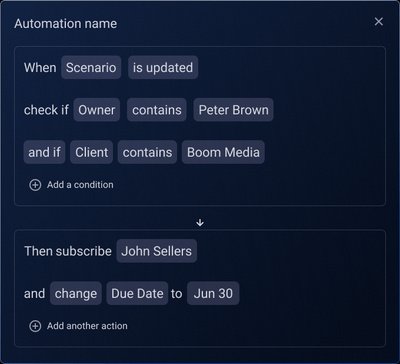
Scenario 2: Media production handover
This automation ensures key stakeholders are immediately looped in and deadlines are set when a specific client's media work reaches a certain point.
- When: "Item field changes" for "Scenario" (e.g., this field is updated).
- If: "Item owner" contains "Peter Brown."
- And If: "Client" field contains "Boom Media."
- Then: "Change item subscribers" to include "John Sellers."
- And: "Change item field" "Due Date" to June 30, 2025.
FAQ
-
How can I check how many automations have been used this month?
You can check usage either in the Workspace Automations screen (by clicking the three dots next to your workspace name) or in the Automation Analytics screen (via the Automations button on your board). Both show total used and available automations for the current month.
-
Who can set up an automation?
Board owners are able to set up automations. (Refer to the roles and permissions article for more details.)
-
How can I use automations in my everyday work?
Automations cover many use cases like:
- Notifications: Auto-alert managers for milestones.
- Due Dates: Set task deadlines automatically upon creation.
- Status Changes: Update statuses when users are subscribed.
-
How can I tell if my automations are working, or what they've done?
Check the activity log on your board or individual items. It records when automations run and their actions.
-
What if I need to change an automation or turn it off?
Go to the Automation list in the Automation Center. Click the three dots next to the automation to Edit, Delete, or toggle it off.